Showing posts with label salt. Show all posts

Monday, March 12, 2012

Barley Risotto

Barley you say? BARLEY!! Yes, barley.  This is literally a thrown together dish of what I had in my fridge and pantry.  It turned out delicious if I do say so myself, so I decided to share it with you all!  So I started with the picture of the onion, lemon, garlic, mushrooms, barley and thyme.  Then when I got into actually making it I ended up using a red onion and I threw in some tomatoes too!  Tomatoes make everything taste better!  So here is the recipe with not so exact measurements as I had to get this on the table quickly.  I eyed a lot of this so if you have any comments please feel free to leave them! 


*Check out the health benefits of barley too!!


Utensils:

spatula
saute pans
chef knife

Ingredients:

2T butter
1/4 red onion, diced
3 cloves garlic, minced
5 medium-large baby bella mushrooms, sliced
2-3 roma tomatoes, diced
salt and pepper
zest of 1/2 a lemon
2 springs thyme, chopped


2c chicken stock
1t salt
1c quick barley


Saute your red onion first for a few minutes.  Then add in the garlic and lightly saute.  Add the mushrooms and continue cooking for about 5 minutes or so. (*) At this point I added my tomatoes and let them cook down for another few minutes.  Make sure you salt and pepper this to taste at this point too.  While this was all sauteeing I was making my barley.  I had bought the quick barley and I heated a little salted chicken stock and added the barley.  Cook until the barley is slightly tender.  Once all the liquid has been soaked up you can add this to your veggie mixture.   Mix in the thyme as well and let this cook together for a few minutes more.  Season again if necessary and add your lemon zest.  Stir together and serve.


*Oh and just a little FYI, I had smoked some boneless pork ribs the night before.  I diced one up and threw it in after I sauteed the onion, garlic, and mushrooms.  Let this saute for a few minutes, then follow the rest of the directions.  You could also use cooked chicken or shrimp.
The smoked pork ribs

Healthy Barley:
http://www.barleyfoods.org/nutrition.html
http://lifestyle.iloveindia.com/lounge/benefits-of-barley-6160.html


Oh and just a little sweet treat I made in between for St. Patty's Day....
Guinness cupcake, Jameson ganache filling, and Bailey's buttercream

Friday, February 24, 2012

Seafood Tacos


So a friend of mine asked me for a good fish taco recipe.  Instead of just fish I decided to throw in some scallops as well.  Really you could add any seafood to this, shrimp, mussels, crab.  It would all be pretty tasty!  This is a super simple and quick recipe and I was able to finish it all up in about 15 minutes.
Don't forget to check the previous blog out to see the lime dressing I use to marinate the beans, corn, onion and cilantro in! http://rollingaroundthekitchen.blogspot.com/2012/02/chickpea-salad.html

Utensils:


Bowl
Spoon
Saute pan
Spatula


Ingredients:

1/4lb Scallops
1-2 White Fish fillets ( I used tilapia, but cod or haddock would 
work too.)
1/2T butter
6-8 small flour or corn tortilla wraps
1/2 can red bean, drained
1 cup corn(fresh is always good, but I used frozen and it's just as good)
red onion(which I forgot to add in...I was in a rush to get dinner on the table, oops)
1/2c cilantro, rough chopped
lime
salt and pepper
sour cream

Combine the beans, corn, red onion and cilantro with the lime dressing that was made from the chickpea salad.  Let sit while cooking the seafood.  Season the fish and scallops with salt and pepper and saute with 1/2T butter until lightly golden brown and cooked through.  Set aside and brown up the tortilla wraps.  Drain the bean mixture and place some on the browned tortillas.  Flake the fish and place on top of beans and add the scallops as well.  You may want to cut the scallops in half to make them fit better.  Top with sour cream if you wish and ENJOY! So simple right? So healthy, fresh and easy.


Fish is Good...


Friday, February 17, 2012

Chickpea Salad


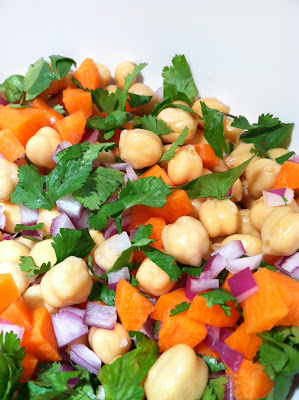
Thanks to friends' birthdays and getting to go to dinner at a yummy restaurant.  From the moment I had this salad I knew I had to figure out how to make it!  And guess what, it's sooooo easy!  I think I got it pretty close to what we had a the restaurant and if not, I don't care because this one is still really good, and my new doggy likes it too.  I just got a new great dane puppy.  His name is Caspian and he is 13 months old! He is so so sweet and follows me around the kitchen when I am in there cooking, waiting for me to drop things.  And since these chickpeas are a little slippery they tend to drop on the floor.  He liked the carrots too and don't forget the cilantro.  Who ever heard of a dog liking cilantro?? Mine does!

So on to the recipe for this chickpea salad.  It's packed with nutrients and gives you a fresh burst with the lime and cilantro. Check out the nutrition websites at the bottom too!

Utensils:

Spatula
Whisk
Bowls
Chef knife
Peeler

Ingredients:

1 can chickpeas, drained(save 2T 'juice')
1 carrot, peeled, chopped
1/4 red onion, chopped
1/4c cilantro, rough chopped
1/4c lime juice
1/4c oil
1 1/2T salt
2tsp pepper

Drain the chickpeas, saving 2T of the 'juice' for the dressing.  Chop the carrot about the same size as the chickpeas and the onion a little bit smaller. Rough chop the cilantro and combine all of the chopped ingredients to the chickpeas. Whisk together the 'juice', lime juice, oil, salt and pepper. Pour over the chickpea salad and cover. Let marinate in the fridge for 10-15 minutes. Drain most of the dressing off the salad and it's ready to eat. (I usually save the dressing and you will see why with the next post of fish and scallop tacos!)


Hope you guys like this salad as much as I do.

Here's Caspian waiting....


Follow Me on Pinterest

Monday, February 13, 2012

Jerky or Biltong

Phew what a week last week!  I had to renew my drivers license...and little did I know I would have to retake the two written tests AND the road test! Aaaaahhhhh.  I felt like I was in high school getting my learners all over again!  Now I have to put in a new fuel tank and of course they found something wrong with my fuel pump as well.  Hmmmmm...go figure!  Oh and then I had to go back a few days later to get a new battery.  All the while these things are happening I decided that jerky was the way to cure my headaches.  Of course cooking or really food in general will always be my cure-all, but this week it was jerky!


This is one food that brings back so many memories of my childhood.  Being born in South Africa, I feel like jerky was almost a staple, except it wasn't called jerky.  It was called biltong, which to me is such a nicer, more appetizing name than 'jerky'.  Also Zach, who is a more than a picky eater, loves jerky.  He requested a while ago for me to make him some jerky.  So this long overdue time has come.  Except I am going to call it Nik's Biltong! I am going to make one for Zach that is not spicy and doesn't have a huge flavor profile, I will remind you again that he is soooo hard to cook for.  It will actually have more of a teriyaki flavor than anything else.

Here goes...


Utensitls:


Chef knife
Bowl
Wire rack
Aluminum foil
Sheet pan


Ingredients:


Beef, sliced thin
1 cup soy sauce
1 cup water
1/4 cup worchestershire sauce

1/4 cup molasses
2T of fresh garlic, chopped
1-2T black pepper
1T salt


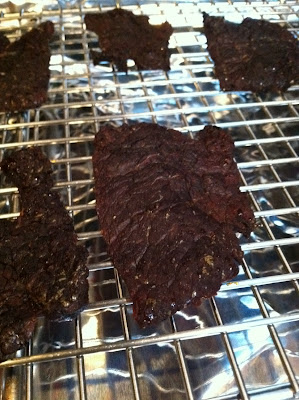
I used a top round steak. You really want the leanest meat possible as the fat will make the meat go rancid.  Slice it thin, about a 1/4' thick and go across the grain. Combine all the ingredients and let the sliced meat marinate covered, in the fridge for at least 10 hours.  Pull out and rinse off with cold water.  Place on a rack and preferably put that on a foil lined sheet pan.  Put the sheet pan in the oven at 170F and crack the door open.  Let dry in the oven for 1hr, turn the oven off, shut the door and continue to dry for about another hour.  


Voila, you have jerky...biltong!  
Follow Me on Pinterest


Saturday, January 28, 2012

Ricotta cheese

Pin It
Here is the yummy ricotta cheese, the one I used in the previous dip post.  I had no idea it was so extremely simple and quick it was to make! So now I will be making this whenever I need or want some instead of the store bought.  Yes, store bought is also simple and quick to go pick up, but there is just something about how what you make tastes so much better.  A sense of accomplishment and knowing it was your hard work that made it! So I hope you all try it and enjoy it as well!

Utenstils:

Stainer
Fine mesh cheesecloth
Spatula
Meauring spoons
Saucepan

Ingredients:

2qt whole milk 
1cup heavy cream 
1tsp salt 
3T lemon juice

Combine milk, cream and salt in saucepan.
Heat on high and stir occasionally. (keep an eye on this as it will boil over if you don't turn the heat down once it starts to boil.)
Bring to a boil and then add lemon juice and turn to med heat.
Stir constantly for two minutes.
Pour into the strainer lined with cheesecloth. (I do this over the sink, but you may also do it over another pot and save the liquid to make mozzarella!!)


Follow Me on Pinterest